Lantern Slides: An Historical Technique
Early attempts at projecting images with light can be traced back to the 17th century when the first iteration of the "magic lantern" was created by the Roman Catholic monk, Athanasius Kircher. Early on, images were hand-painted on glass slides in order to create "moving image" projections for entertainment. Since it was difficult to hand-paint fine details on the small pieces of glass, the quality of these slides was often poor. Generally, they were considered useful for little more than children's toys.
It was not until 1849, ten years after the invention of photography, that the more modern conception of the lantern slide was invented by the brothers William and Frederick Langenheim in Philadelphia. They patented their invention in 1850 and Philadelphia subsequently became one of the country's largest hubs for the commercial manufacturing of lantern slides.
Manufacturers and slide dealers quickly began to offer sets on a wide variety of subjects - everything from travel to illustrated moral lessons. Manufacturers could also be commissioned to create slides for individuals (like McKnight) and public and private photographers would create slides of their own images, or work for hire to fulfill requests for a set on a specific subject.
Educational sets for public lectures on a myriad of topics also began to circulate. Travel was one of the most popular themes and people like McKnight began working as public speakers to present on their collections. They would travel to different schools or institutions to give their lectures. New York City, for example, had a public lecture network that included over 600 speakers and some institutions would even award vocational certificates if one completed a certain series of lectures. Oftentimes, sets of slides commercially produced for such uses would be sold along with books that described each slide in detail. Eventually, this made it easier for educators to incorporate these sets into their lesson plans.
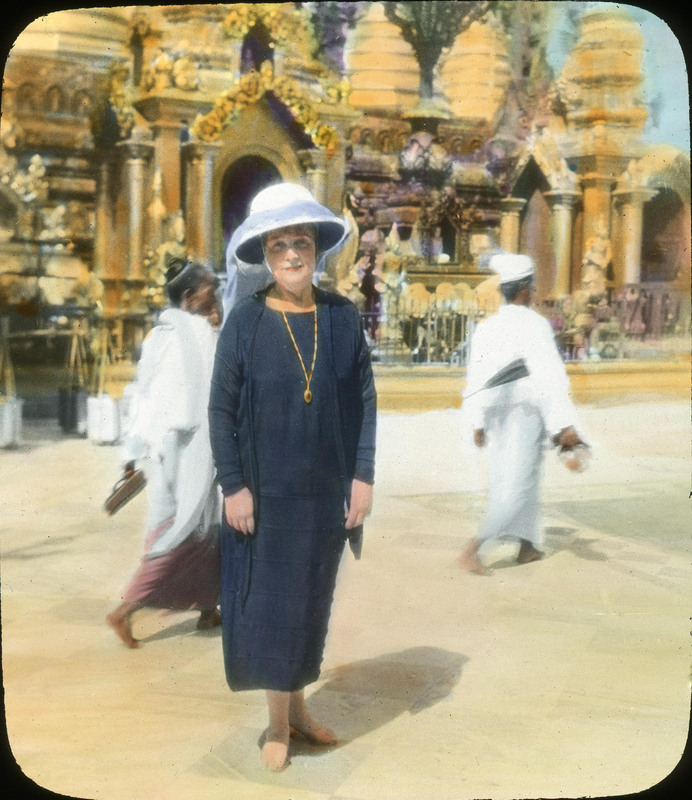
Initially, lantern slide projectors were fueled by burning oil, gas, or pieces of calcium, making them somewhat trickier to use. It wasn't until the 1890s, after the introduction of electricity and electric stereopticons, that lantern slide collections were regularly used in classrooms. Thus, McKnight's public lectures, especially ones covering artistic and cultural topics illustrated with colored examples, were almost without compare. The relatively unique experience of seeing such beautiful wonders of the world surely helped to fuel the popularity and success of her lectures.

Making a Lantern Slide
The processes for making lantern slides in McKnight's time were not dissimilar from the methods for developing photographic prints. There were two general approaches to production. The contact method involved exposing a photographic negative directly onto a light-sensitive piece of glass. The glass and negative needed to already be the size desired for the final product, typically about three and a quarter square inches. The glass plates were placed on a wooden frame and the negative laid carefully on top. Plates would then be developed with chemicals and exposed to either natural or artificial light.
If one wished to develop a slide at a different size from the negative, the camera method could be used. This process was more difficult and technically involved, as it required more equipment. The plate and negative were placed in a camera. The job then proceeded like taking a picture of the negative rather than an outside subject. Light would pass through the negative, then through the camera's lens, and finally it would expose the image onto the plate. The tricky part was having the proper set-up to hold the negative to the camera's lens. The illustration above is from a 1892 guide to making lantern slides and shows one such possible arrangement.

After the image had been exposed to the plate, the slide was developed in chemical baths in a similar way to regular photographs. The precise mix of chemicals and the recommended time to expose the slides varied, depending on how clear and intense the manufacturer wanted the image.
Once the slide was all developed, cleaned, and dried, the plate was ready to be bound. Typically, a paper mat was placed on the slide to create a kind of frame for the image. Finally, a piece of glass was bound to the slide plate to cover and protect the emulsified side, and then the finished product was ready to be used.

Many of McKnight's slides were produced by well-known slide manufacturers of the time, in both Europe and the United States. Her collection includes the handiwork of companies such as T.H. McAllister from New York, Levy & Ses Fils, Photographes from Paris, and local companies such as the Baker-Coster Photo Company in Grand Rapids and the Detroit Photographic Studio.
Coloring Lantern Slides
If a manufacturer were to offer colored slides, there were a few different ways to achieve this. Sometimes slides were tinted by applying even washes of one tone to the entire plate and colors could be altered in the developing process. Alternatively, one could add colors to a black and white image. This coloring process allowed for more detail and control in the application of color. McKnight used this method, employing colorists to colorize her slides.
Plates could be colored with water colors or oils, although the latter presented more challenges in getting the colors to be transparent enough for light to pass through when the slide was projected. Therefore, a thinning agent such as varnish or turpentine was often mixed into the colors. The limitations posed by the need for transparency also affected the range of colors that could be used. Ones that were typically recommended included crimson, indigo, Prussian blue, Italian pink, burnt sienna, rose madder, purple madder, raw sienna, and ivory black. The slides McKnight had colored from her travels to Hawaii are particularly bright and bold. They suggest that she was keen on making use of some of the best colors available.

Slide plates usually had one side that was smoother than the other, and this was the side that would be colored. The plate was prepared by washing it with a weak solution of water and ammonia. Requiring a steady hand, colorists often worked off a kind of table-top easel with a wooden frame around clear glass to rest the slide on. The frame sat up at an angle with a plain sheet of paper on the table below so that the colorist could clearly see how the colors would appear. It was important for the colorist to keep the inks moist while working, and this was most easily achieved by periodically breathing gently over the slide as it was colored. To finish, a layer of varnish was swept over the plate to preserve the work.

Not all slides were the most suitable for coloring. Typically, ones with plenty of clear detail and weak shadows (so the color could more easily show through) were the best choices. McKnight was clearly aware of the importance of carefully selecting which of her slides would be colored. In a letter concerning the creation of some slides for a lecture featuring the Library of Congress, she lists specific colors for various plates. She also stipulates that only the best slides be selected for coloring, stating "it is quality and not quantity that I want in this lecture" (original emphasis). McKnight was invested in having her collection be as fine and accurate as possible.

Of course it was not possible for the colors to match the original exactly. Sometimes, the colors of the plate would differ remarkably, even between slides of the same work (see the two versions of Sargent's Carnation, Lily, Lily, Rose below). Perhaps the colorist was experimenting with the inks available to them to see which ones would produce the best results. Or maybe they were testing the limits of their own artistic influence. Regardless, the colored portion of McKnight's collection was especially important for her lectures on works of art. She considered these reproductions, no matter how they were colored, as being essential to the proper study of the work. For example, notice below the difference in clarity between the black and white and the colored images of Whistler's Symphony in White #2: The Little White Girl.


Anna Caulfield McKnight
Anna's Illustrated Lectures